Slow Cooker Korean Style Pot Roast w/ Kimchi

HOLD. THE. PHONE.

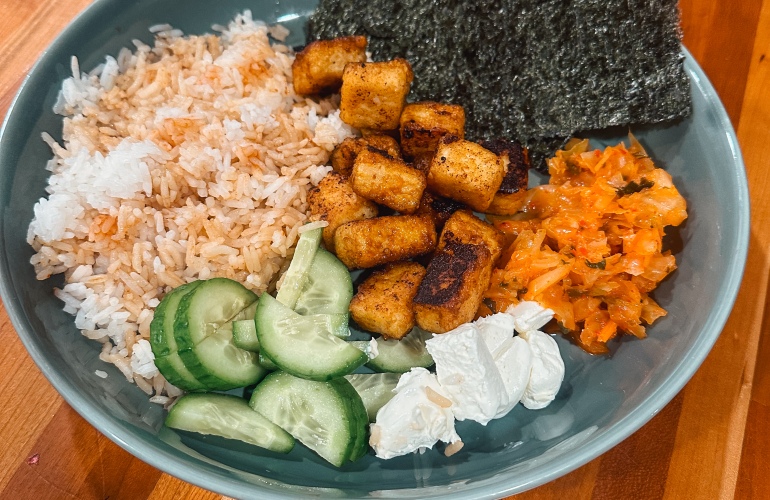
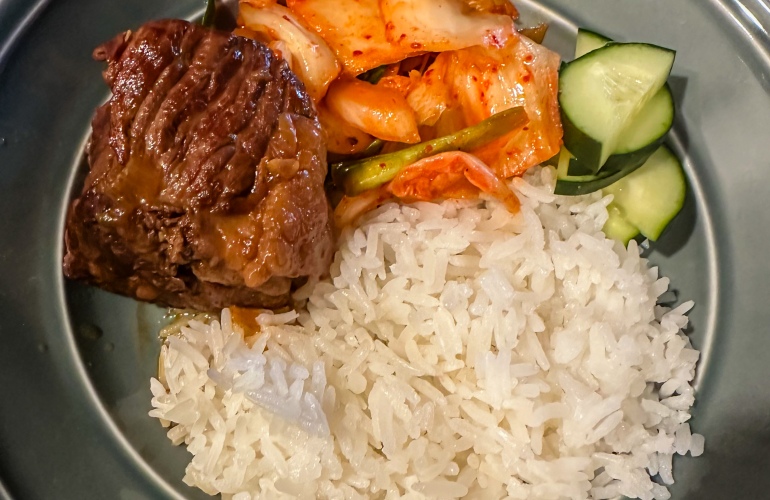
This is a new favorite recipe that I need everyone to make ASAP. The Modern Proper gives various different ways to make this dish but I say the best route is LOW and SLOW. This is an easy recipe to prep in the morning and forget until dinner time. I served mine with kimchi from a local Asian market, some cucumbers for extra crunch, and some white rice. I shared some with my mom and her friend & still had more to pack lunches for the week. What’s great about this dish is it’s all the deliciousness of a pot roast without the heaviness.

Ingredients

  • 4 to 5lb Chuck Roast, cut into 3 in pieces
  • 1 TBSP Salt
  • 1 TBSP Canola or Vegetable Oil
  • 1 Sweet Onion, thinly sliced
  • 6 Garlic Cloves, finely chopped
  • 1 TBSP Fresh Grated Ginger
  • 2 TBSP Gochujang Paste
  • 1/4 Cup Brown Sugar
  • 1/2 Cup Soy Sauce
  • 2 Cups Beef Stock
  • Cooked Rice & Kimchi for serving

Let’s Get Cooking

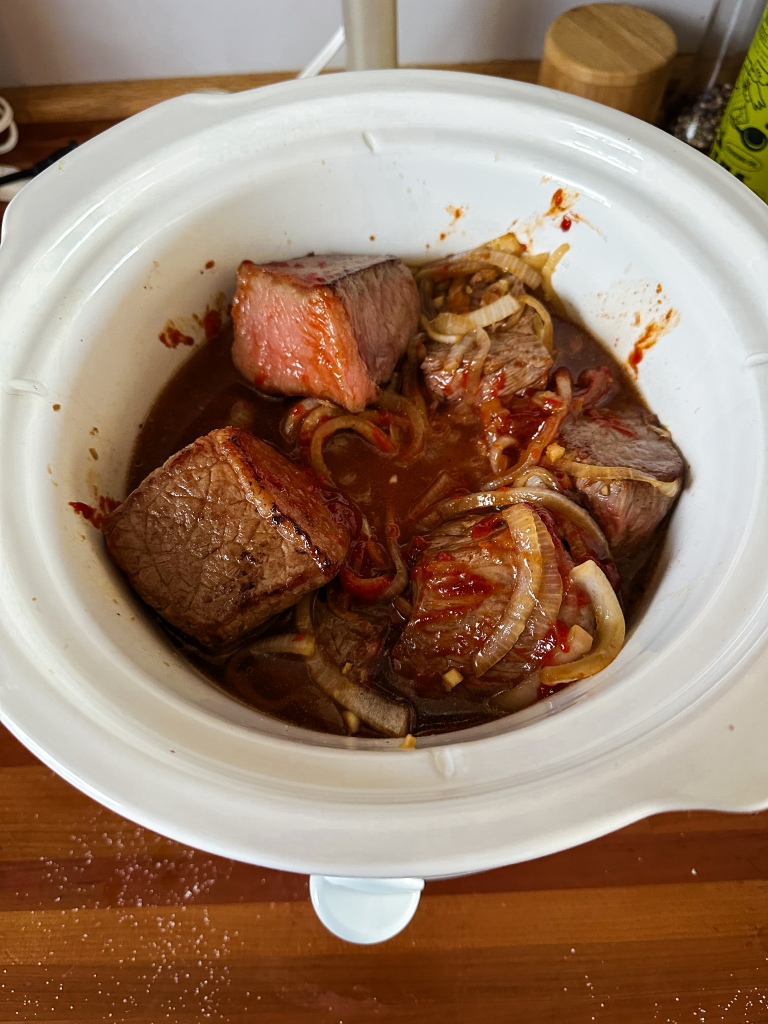
Pat the beef dry and season with salt. Heat the oil in a large Dutch oven over MED-HIGH heat. Once the oil is hot, brown the meat on all sides in batches and transfer to a slow cooker.

Add the onions to the Dutch oven and cook until softened about 4 minutes. Add in the garlic + ginger and stir until fragrant, about 1 minute. Add in 1/4 cup of beef stock and scrape up the browned bits. Transfer to the slow cooker.

To the slow cooker stir in the gochujang + brown sugar + soy sauce + remaining 2 Cups of Beef Stock. Cover and cook on low for 8-9 hours.

Serve with cooked rice, cucumbers, and kimchi.

Made with Love,

Hannah

“It’s Fun to Eat at the Rye-MCA” Burger

Another day another Bob’s Burger. This one here is simple, but my goodness is it delicious. The rye bread is a replacement for a bun and you would think it doesn’t make a difference, but it absolutely does! If you’re not a horseradish person I would say to you, think again! The cheese milds out the horseradish while also making the mustard POP!

Ingredients

  • 1 TBSP Butter
  • 1/2 Yellow Onion, thinly sliced
  • 1LB Ground Beef
  • Cheddar Cheese, slicked 1/4 in thick
  • Sliced Rye Bread, get the good stuff
  • Boston or Green Leaf Lettuce
  • 4 TBSP Prepared Horseradish
  • Brown Mustard

Let’s Get Cooking

Start with cooking the onions. Melt the butter in a wide frying pan over MED-LOW heat. Add in the sliced onion and stir to coat. Cook over LOW heat, stirring occasionally, until the onions are soft and sticky golden brown, about 20-30 min.

Make the burger patties and season both side with salt and pepper. Cook them to your liking. Just before the burgers finish cooking, top with caramelized onions and a slice of cheddar cheese, cover, and tent to help the cheese melt. Once cheese is melted remove from heat.

Now is the time to build your burger!

Start with Rye bread, lettuce, cheeseburger, a spoonful of horseradish, and the ‘top bun’ of rye bread with brown mustard slathered on one side.

Serve with french fries & enjoy!

Made with Love,

Hannah

Hannie’s Mac & Cheese

In honor of my upcoming 28th Birthday on Monday I wanted to share my new mac & cheese creation! Nothing says comfort like Mac & Cheese. It’s the perfect pairing of two beautiful things, pasta & cheese. I followed @Arianna on Tik Tok’s recipe as the base but I switched it up with the cheeses a lil. I added blue cheese crumbles, now if you don’t like blue cheese I beg you to still give this a try as it adds the perfect amount of funkiness and adds to that creamy mouth feel. DON’T KNOCK IT TIL YOU TRY IT.

Ingredients

  • 1 Box Noodles. I used wide rigatoni noodles
  • Chicken stock for boiling
  • 4 TBSP Butter
  • 1/4 Cup Flour
  • 3 Cups Half & Half or Heavy Cream
  • 6 oz Smoked Gouda, shredded
  • 8 oz Sharp Cheddar Cheese, shredded
  • 8 oz Sharp White Cheddar Cheese, shredded
  • 8 oz Colby Jack, shredded
  • 1/4 Cup Crumbled Bleu Cheese
  • 1/2 Cup Cream Cheese
  • 1 Cup Sour Cream
  • Salt + Pepper
  • 1/2 TSP Garlic Powder
  • Paprika for topping

Let’s Get Cooking

Preheat the oven to 350F

Fill a large pot with chicken stock + water + salt and cook the noodles according to the package. Drain, BUT DON’T RINSE, and place in your preferred baking dish, stir in the sour cream and mix until coated..

In a medium/large saucepan, add in the butter and melt on MED/HIGH heat.

Let the butter melt before adding the flour, and whisk until combined and the rue turns a golden brown, about 3-4 minutes. While mixing, slowly add in the Heavy cream/Half & Half in 1 cup increments. Let come to a low boil, for 3-4 minutes.

Once the mixture has thickened, add in the cream cheese and mix until melted. Add three-quarters of the rest of the cheeses [be sure to save some for topping], mix until melted.

Add in the spices, remove sauce from heat, and pour over the noodles.

Top with remaining cheese and paprika and bake for 20 minutes. Finish off by broiling on HIGH for 5-7 minutes until the top is golden brown.

Serve warm & enjoy!

Made with Love,

Hannah

Chocolate Orange Baked Donuts

Chocolate and orange is such an underrated combo. We always reach for the strawberries or the Oreos to pair with chocolate, but what about the oranges!?! With all this lovely orange citrus, Love Eat Sleep Food helped me with my ode to chocolate and orange with these baked donuts. They are such a yummy treat and you don’t need to stress with all the frying.

Ingredients

Chocolate Cake

  • 1 Cup + 2 TBSP All Purpose Flour
  • 5 TBSP Cocoa Powder
  • 3/4 TSP Baking Powder
  • 1/4 TSP Baking Soda
  • 1/4 TSP Salt
  • 43g Butter
  • 1/3 Milk Chocolate Chips
  • 1 TSP Coffee
  • 1 Egg
  • 3/4 Buttermilk
  • 1 TSP Vanilla
  • 3 TBSP Orange Juice
  • 1 TSP Orange extract
  • Zest of 1 Orange

Icing

  • 4 oz Chopped Dark Chocolate
  • 1/2 Cup Heavy Cream
  • 1 TBSP Orange Juice
  • 1 TBSP Butter
  • Orange slices for decoration

Let’s Get Baking

Preheat the oven to 350F

In a small saucepan heat the butter until melted. While waiting to melt, combine the flour + baking powder + baking soda + cocoa powder + salt in a medium bowl.

Add the chocolate chips to the saucepan, as well as coffee + orange juice + vanilla + milk, mix to combine. Let cool briefly until adding brown sugar + orange zest + egg. Stir to combine.

Add the wet ingredients to the dry and fold, don’t over mix. Pour the ingredients into a zip log bag and make a small incision. Pipe into a donut pan until it’s 2/3 full.

Bake for 13-15 minutes.

While baking make the icing!

Place the chopped chocolate to a heatproof bowl. In a seperate saucepan, add the heavy cream and bring to a simmer. Add in the chocolate + orange juice, stir to combine. After letting sit for 5 minutes, add in the butter and stir until smooth.

Wait for the donuts to cool before dipping in the ganache.

Top with orange zest + slices.

Made with Love,

Hannah

Chicken, Spinach, & Artichoke Soup

Soup season is slowly making its way to a close, but before it’s over this chicken, spinach, & artichoke soup from Sarah DiGregorio is a MUST MAKE. The recipe can be made on the stovetop, but I made it in the crockpot because nothing is better than low and slow. The recipe calls for frozen spinach, but I used fresh and it still came out great, I used about 2 Cups but it’s totally your call!

Ingredients

  • 2 TBSP Unsalted Butter
  • 1 Large Yellow Onion, finely chopped
  • Salt + Pepper
  • 3 Celery Stalks, chopped
  • 8 Garlic Cloves, smashed & chopped
  • 2 lbs Boneless, Skinless Chicken Thighs
  • 1 Cup Chicken Stock
  • 1/2 Cup White Wine
  • 1/2 Lemon, Juiced
  • 1 TSP Red Pepper Flakes
  • 1 10oz Package Frozen Cut Spinach, or 2 Cups Fresh Spinach
  • 1 10oz Jar Marinated Artichoke hearts, drained
  • 1/2 Cup Cream Cheese
  • 1/2 Cup Finely Chopped Fresh Dill or 2 TBSP Dried Dill
  • Scallions & Grated Parm for topping

Let’s Get Cooking

In a large skillet, melt the butter over MED-HIGH heat. Add in the onion and season lightly with salt, stir until soften and translucent. Add in the celery + garlic and stir until soften, lower the heat if needed to avoid burning. Pour the mixture into a slow cooker.

To the slow cooker, add in chicken thighs + stock + wine + lemon juice. Season with red pepper flakes + 1 TSP Salt + black pepper and mix well to combine. Cover and cook on low for 4 hours. ** The dish can stay on the warm setting for a few hours following the cook time if needed **

About 20 min before you’re ready to eat, add in the spinach + artichoke hearts to the slow cooker and cook on low until the spinach can be stirred into the soup.

Add in the cream cheese + dill and stir until the cream cheese melts in.

Shred the chicken and serve in bowls, topping with parm and scallions.

Made with Love,

Hannah

“Pickle My Funny Bone” Burger

I am a pickle girl, as I am sure I have shared before, so of course I had to make this fried pickle burger by our BFF Bob. It is one of the more simple burgers that Mr. Belcher has to offer, with fried pickles and a spicy mayo being the stars of the show; but don’t let simple fool you, because DAMN it’s good.

Ingredients

  • Vegetable/Canola Oil for Frying
  • 1/3 Cup Flour
  • 1/3 Cup Cornmeal
  • 1 Egg
  • 1 TBSP Old Bay Seasoning
  • 1 TSP Crushed Red Pepper Flakes
  • 1 16 oz jar Kosher Dill Pickle Chips
  • 4 Hamburger Buns
  • 1/2 Cup Mayo
  • 1 TBSP Frank’s Red Hot
  • 1 TSP Ketchup
  • 1 lb Ground Beef
  • Green Leaf Lettuce

Let’s Get Cooking

In a deep saucepan, heat about an inch of oil to 350F.

Mix the flour + cornmeal + seasoning + red pepper flakes in a large bowl. In a small bowl, crack the egg and beat it.

Drain the pickle chips and pat dry. Dunk the pickles in the eggs and then dredge in the seasoned flour. Fry the coated pickle chips in small batches until they turn golden brown. Remove from the oil with a slotted spoon. Be sure to check the oil temperature between batches.

In a bowl, mix together mayo + hot sauce + ketchup, adjusting per your taste.

Form the beef into 4 patties, season both sides with salt + pepper, and cook to your liking.

To build the burger: bottom bun, lettuce, burger, fried pickles, spicy mayo, top bun.

Made with Love,

Hannah

Citrus Champagne Bundt Cake

In December my mom went on a Christmas market cruise all throughout France and parts of Europe. In addition to cute and quirky Christmas ornaments, she also brought me this BEAUTIFUL bundt cake mold. The story goes that Marie Antoinette ran into one of these shops because of the rain and used the bundt cake pan as a hat to shield her hair! How true that is, we can speculate but I think it’s such a cute story & you can definitely tell why she chose that shop!

To break in the mold, I wanted to showcase the lovely winter citrus that we have! I followed Tutti-Dolci’s guide for the cake, the only thing I changed was making an orange frosting to drizzle over top. Take note from me and fill your pan only about 3/4 the way full, I went a little overboard and I had some spillage. It’s all good though, it was a delicious mistake!

Ingredients

  • 2 1/2 Cups Flour
  • 3/4 TSP Baking Powder
  • 1/4 TSP Baking Soda
  • 1/2 TSP Salt
  • 1 1/2 Cups Sugar
  • 3 TBSP Fresh Citrus Zest, I used oranges but you could use oranges, lemons, grapefruits
  • 10 TBSP Unsalted butter, room temp
  • 2 Eggs, room temp
  • 1 Cup Champagne/Prosecco
  • 1/4 Cup Citrus juice, again your choice
  • 1 TSP Vanilla Extract

Frosting

  • 5 TBSP Orange Juice [use whatever citrus you’re using]
  • 5 TBSP Powdered Sugar

Let’s Get Baking

Preheat your oven to 350F and butter or spray your bundt pan

Combine the flour + baking powder + baking soda + salt in a medium bowl

In a food processor, pulse together sugar + citrus zest and place in a large mixing bowl with butter. Mix together until pale and fluffy. Reduce the speed to slow and add in the eggs one at a time.

Slowly add in the flour until almost incorporated. Add in the champagne + citrus juice + vanilla and mix until combined.

Spoon the batter into the bundt pan and tap the pan sharply to reduce trapped air bubbles.

Bake for 40-44 minutes or until a tester comes back clean. This part absolutely depends on your pan and your oven, since my pan was ceramic, it took closer to 65 minutes.

While baking, combine the frosting ingredients, adding more if needed, and mix well. After allowing the cake to cool, drizzle the cake with frosting and enjoy!

Made with Love,

Hannah

Veggie-Packed Slow Cooker Chicken Noodle Soup

It’s cold in Ohio, I know we shouldn’t be surprised. We just had freezing temperatures, a snowstorm, and then raining ice, so needless to say, we are all working on staying warm. I wanted to get back to the basics and make a chicken noodle soup. I used Nyssa’s Kitchen recipe for her turmeric chicken soup as a guide to make a veggie-packed soup with creamy broth. I made a few tweaks here and there but this soup is a keeper & it helped me stay warm, I mean they do say chicken soup is good for the soul!

Ingredients

  • 1 Medium Yellow Onion, Diced
  • 1 Large Leek, white and light green parts only, halved and thinly sliced
  • 3 Large Carrots, thinly sliced
  • 3 Celery Stalks, thinly sliced
  • 1 TSP Salt
  • 3 Garlic Cloves, chopped
  • 1 TSP Turmeric
  • 1 TSP Poultry Seasoning
  • 6 Cups Chicken Broth, I used turkey bc that’s all I had
  • 1 13.5 oz Can Coconut Milk
  • 1 1/4 lbs Boneless Chicken Breasts
  • 1 10 oz Bag Frozen Peas
  • 1 Cup of Kale
  • 1 TBSP Parsley
  • Cooked Egg Noodles
  • Black Pepper

Let’s Get Cooking

In a skillet on MED heat, combine the olive oil + onion + leeks + celery + salt. Saute together for about 10 minutes, until the onions begin to soften.

Add in the garlic + turmeric + poultry seasoning and stir to combine, let cook for about 3 minutes.

Place the raw chicken into the crock pot and top with the sauteed veggies. Pour over the broth and place the crock pot on high for 4 hours

Once done, remove the chicken, shred it, and return back to the crock pot. Stir in the coconut milk + frozen peas + kale + parsley and allow to cook for about another hour on low, or until the peas are bright green.

During this time, cook up your egg noodles per package instructions.

Serve the soup over the cooked egg noodles, top with extra pepper & warm up!

Made with Love,

Hannah

Crispy Tofu Bowls

I live by the motto; “I will try anything once”. Well, I tried tofu once, and I fucking hated it. The texture about sent me over the edge. Now I’m always open to second chances so I thought I would try tofu again and I am so happy that I did. I am trying to do a few meatless Mondays and I decided that I would give tofu another shot. I am so grateful for Yummy Bowl’s guidance on making this delicious crispy tofu that makes a perfect weeknight dinner. I also love that since making a large batch, it reheats brilliantly in the air fryer.

Ingredients

  • 1 pack Extra Firm or Firm Tofu
  • 2-3 TBSP Sesame Oil
  • 2 TBSP Cornstarch
  • Salt + Pepper
  • 1 TBSP Soy Sauce
  • 1 TSP Honey
  • 1 TSP Red Pepper Flakes

For Bowls:

  • Cooked Rice
  • Cucumbers, sliced
  • Kimchi
  • Nori
  • Avocado
  • Cream Cheese
  • Edamame

Start with draining the tofu and place it in between paper towels with a weight on top to get out as much water as possible.

Once you have most of the water out, cut the tofu into thick cubes, about 2-3 inches. In smaller batches toss the pieces in cornstarch until fully covered. Season with salt + pepper

Heat the sesame oil in a large non-stick pan. In batches, pan-fry the tofu until they are browned and crispy on all sides, taking about 2-3 minutes on each side. This does take a little more time, but just take a few deep breaths and take a moment to be mindful.

Once all the tofu is cooked, place back into the pan & add in the soy sauce + honey + red pepper flakes. Toss to coat then add to a bowl with the ingredients of your choosing!

Made with Love,

Hannah

Shakshuka

I do not know what it is about Shakshuka, but every time I saw photos of this dish I had a burning desire to make it. Shakshuka is a Maghrebi dish, originating in North Africa. It’s often a dish served for breakfast but I decided to follow Downshiftology’s recipe and create a ‘breakfast for dinner’ moment. I paired this with some homemade sourdough bread, as this dish is perfect for dipping. You definitely do not want any of those eggy-tomatoey bits to go to waste!

Ingredients

  • 2 TBSP Olive Oil
  • 1 Medium Onion, diced
  • 1 Red Bell Pepper, seeded & diced
  • 4 Garlic Cloves, finely chopped
  • 2 TSP Paprika
  • 1 TSP Cumin
  • 1/4 TSP Chili Powder
  • 1 28oz can Whole Peeled Tomatoes/ I used diced tomatoes & worked out perfectly
  • 2 eggs [ it’s just me so obvi of there are more of you cook 2 eggs per person]
  • 1 TSP Cilantro
  • 1 TSP Parsley
  • 1 bunch fresh Mint

Let’s Get Cooking

Heat the olive oil in a large saute pan on MED heat.

Add in the bell pepper + onion and cook for about 5 min, until the onion becomes translucent. Add in garlic + paprika + cumin + chili powder and mix well to incorporate.

Pour in the tomatoes + juice and using a wooden spatula break down the tomatoes, you can skip this part if you are using chopped tomatoes. Season with salt + pepper and bring to a simmer

Using a large spoon, make a well into the sauce and crack an egg into each well. Cook the egg for about 5-8 minutes or until your liking.

Top with parsley + cilantro + mint & serve with crusty bread.

I hope this dish lives up to your hopes like it did for me.

Made with Love,

Hannah